Battle Expired Anchovy!

Thursday, December 21st, 2006

I did not think twice about provisioning a dozen tins of anchovies when I did our pre-departure Trader Joes run. Surely we would be eating Caesar Salad every night and would be out by San Diego. As fate would have it, lettuce lasts poorly without refrigeration and the romaine variety is all but nonexistent south of the California border.

Now, a year later, I have many, many tins of anchovies and they are all expired. More importantly, anchovies lose structural integrity after a year in the tin and turn into brown mush. Brown mush interspersed with wee bones. Let this be a lesson to you all.

But I am determined and stubborn–if not particularly foresightful–about such matters and so every one of these tins of anchovies must be used up at all costs. Soon.

What the hell do you do with anchovies if you can’t make Caesar salad? A good question indeed; one which I would love to ask the Internet but alas, there’s no internet here.

Answer #1: Anchovy and Olive (also expired) Surprise on Toasts!

Anchovies are not the only expired can around here; in addition, we have a can of imitation abalone that Joshua bought a few years ago thinking it was funny and which I have no idea what to do with. Also several cans of milk products: sweetened condensed, “table cream,” evaporated (which is actually liquid), dulce de leche, and lactose-free regular. Also, a small tin of those lame sliced black olives whose presence in our lives is a huge mystery.

We had a loaf of stale ciabatta to eat and so we wrapped the bread in foil and toasted it over the burner in a makeshift lean-to of various pots and pan lids.

Then I mixed minced garlic (two cloves), the can of anchovy mush (minus oil), the sliced olives further sliced, one tomato diced finely, grated parmesan cheese procured from an Italian deli populated with products from the actual country of Italy (this is what saved the dish), olive oil, pepper, and hot sauce. We ate this over the toast and it was quite tasty. Improvements could be made by using more exotic olives such as Moroccan oil-cured. Also, using fresh anchovies.

Answer #2: Warm Multi-Pasta Salad!

Flush from the success of the first Anchovy Battle, we did something very similar but with pasta. Many of the same ingredients went into the ‘sauce’: one large tomato diced, can anchovy sludge (sans oil), chopped green herbed olives (also about to expire, jeez!), garlic cloves (minced), tablespoon or so of balsamic vinegar, olive oil, basil, oregano, salt (only if necessary because the anchovies are already salty), pepper, and a pinch of chili flakes. Mix together and set aside. Boil water and make pasta of choice (we used an artful mixture of left-over elbows, penne, and shells). Mix together and voila!

Answer #3: Puttanesca Sauce!

Puta madre! Another tasty pasta creation that leaves me one more anchovy tin down.

Mash together: a couple of tablespoons of olive oil, half tin of anchovy filets (bonus: mine just happen to be already mashed; I also used the whole tin), three cloves crushed garlic. Now, take half of this mixture and sauté it with three chopped or crushed roma tomatoes until they are soft. Add the rest of the mashed sauce, two tablespoons of capers, half a cup of olives (like good ones, not those canned black pitted nasties), and pepper. You probably won’t need any salt after the olives and anchovies. Simmer over low heat an additional twenty minutes and finally serve over pasta. We used the last of our high-quality Jasmine penne. This would be excellent with a bit of parmesan grated over the top. If parmesan existed anywhere within a 100-mile radius of this boat. Which it doesn’t. So sad.

Answer #4: Miraculous Anchovy and Almond Tapenade (tossed with veggies)!

Jerry and Joni from Lotus gave us an awesome cookbook, which I highly recommend to anyone on a boat (The Cruising Chef by Mike Greenwald). The current revised edition is an excellent read with easy to deal with recipes introduced with great stories and much humor. Lotus had two copies and I ended up with an original first edition from 1977 and it is such a gem; it’s loaded with ink illustrations and delightfully un-PC recipes and stories (whale hunting! MSG!). I immediately scoured it for anchovy recipes and found this.

For veggies, I steamed some green beans until just about done. Then I fried a bunch of chopped almonds and several garlic chunks in butter until they started to turn slightly golden (the almonds take longer than the garlic so I suggest starting the almonds, then adding the garlic later unless you want crispy brown garlic pieces). Here is where you add chopped anchovy filets, according to Mike Greenwald. Here is where I diverged from the recipe. Gazing at my anchovy filets-turned-mush, a delicious almond-garlic-butter aroma wafting around the galley, I decided to just leave them out actually and I chucked the tin. I added the green beans and stir-fried them in the almond butter garlic, adding salt and pepper. Very tasty.

Answer #5: Happily Trashed Anchovy Tin!

Enough already. I’m sick of anchovies now.


Let’s Cooking = Pupusas

Thursday, November 16th, 2006

I may have mentioned a few thousand times about the dismaying blandness of Central American food, particularly after the richness and variety of Mexican cuisine. The mercados no longer offer a rainbow of hot peppers, even the ever-present chili poblano disappeared, only to be replaced by a lighter-green facsimile that has no apparent spice whatsoever. El Salvador cooking, however, in my vaguely biased opinion, is a bit more exciting in general but there is one shining gem that not only makes El Salvador a food destination, but nearly redeems all of Central America, just knowing this island of potential deliciousness exists. And this is the Pupusa.

Pupusas are like a stuffed tortilla, made either of corn or rice flour. We have found both rice and corn to be available nearly everywhere we’ve gone. They are about six inches in diameter, thick with fillings of cheese, beans, chicharrόn (fatty pork), or any combination thereof; a mixture of all three is called ‘revueltas.’ In San Salvador, you can often find cheese and ‘ayote,’ a grated squash, and these are particularly excellent. On the Estero, at Mar y Sol, we often ordered cheese and shrimp. Invariably it is served with ‘curtido,’ a shredded cabbage, carrot, and onion saurkraut-ish salad, as well as a mild tomato sauce. They cost from 25 cents on the street to 40 cents depending upon how ‘fancy’ the restaurant is; I can eat two. Frequently I think I want to eat three, but experience has taught me that I will be sorry and to always stick with two.

In San Salvador, particularly near the center or around the market, there are pupusa stands set up everywhere you look. They line the sidewalks of certain streets, one after another; some cooking corn pupusas and some cooking rice ones. Despite my corn intolerance, I broke down once (for the sake of science) and ate a couple of corn pupusas. I have to say the corn are perhaps a little better—I find they have a richer flavor, but typically I was forced for the sake of sanity and well-being to stick to the rice pupusas and many people prefer these to the corn.

Pupusa Stand. San Salvador, El Salvador

This woman had her pupusa stand set up a few blocks from the hotel we typically stayed in, near the technical university in San Salvador. The number of pupusa stands is staggering in this section of town and since she was on a side street off the major busy diesel-choked bus street, we generally made a beeline for her stand the moment we exited our hotel in the mornings. (Even so, avoiding busses is nearly impossible in this city, as you can see.)

You can see the large aluminum bowls of fillings; she makes two different sizes, the six-incher and another smaller one, of around four inch’s diameter. Most people seem to order the smaller size in the mornings, possibly because it is easier to eat with your hands. Pupusas are typically eaten with the hands; utensils are used only to scoop the curtido out of the jar. We would usually try to ask if they had any sort of utensils (we are not as skilled at not making a mess if we eat them with our hands; besides, they are always hot as hell to touch when they come off the grill) and this would be met with confused looks like, ‘just what are you going to DO with that fork?’ or sometimes a lengthy search resulting in one bent-up aluminum fork and one dusty plastic coffee spoon. We actually took to carrying around a couple of plastic forks wherever we went in case we needed a pupusa or two and this always killed the pupusa ladies; they would nudge each other at our curious gringo habits, we would give them a big goofy grin, and they would burst into raucous laughter.
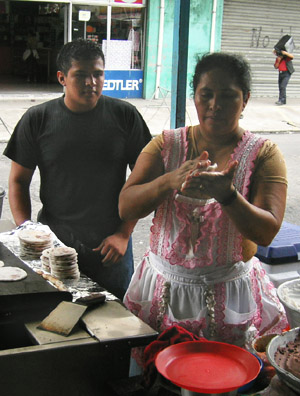
Pupusa Stand. San Salvador, El Salvador

She was either assisted by her son or her husband (today is the son).
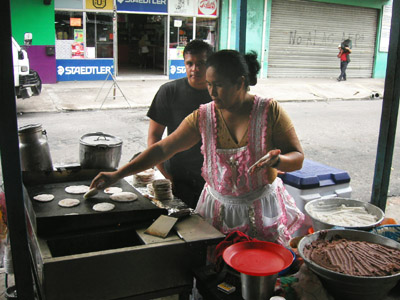
Pupusa Stand. San Salvador, El Salvador

The aluminum canister on the left is the coffee urn. Coffee, albeit brewed (not instant), is weak and much sugar is added. Sounds gross but we sort of developed a taste for it when we were in the city. The pupusa stands usually also have an urn of hot chocolate in the mornings. (Note the elaborate market apron; market women in El Salvador invariably wear one of these aprons, although generally they don’t have the bib part, just the skirt.)
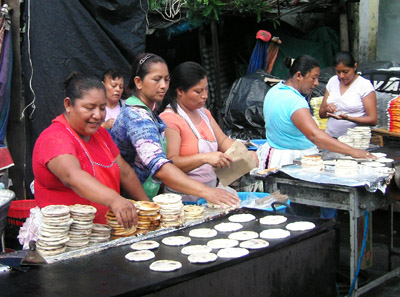
Pupusa Stand. San Salvador, El Salvador

This was our other favorite street pupusa stand; they were located a block off the central square in the market and they always had cheese and ayote pupusas. The only problem is that they did not have tables set up—you had to take your pupusa to go wrapped in brown paper with a little plastic baggie of curtido and a baggie of tomato sauce.

PUPUSAS

(Dough)
* Rice flour or corn flour (masa). I’ve only tried this with rice flour, which can probably be found in the US in any sort of Co-op or Whole Foods type stores, at least.
* Water

To prepare:
For two pupusas per person, use 1/4 to 1/3 cup of rice flour (or masa, presumably) per person. Add water and mix until you have a dryish pasty consistency. Imagine something you might be able to ball up in your hands… That’s it; it’s insanely easy and I recommend making all the fillings, curtido, and tomato sauces in advance (and in quantity) and then putting together the dough at the last minute whenever you want to cook them.

(Fillings)
* Cheese. Salvadorian cheese, ‘quesillo,’ is a soft melting cheese and either comes mixed with flower buds, called ‘loroco,’ or loroco is added. I have not achieved consistency perfection yet with the cheese, but you must chop and blend it somehow with the flower buds until it becomes creamy, even sort of pasty. A possible US substitution might be a soft mozzarella, chopped and smashed to a more pasty consistency; chives could be mixed in or maybe minced squash blossoms would be good. (You need the pasty consistency when assembling the pupusas.)
* Beans. Basically, use refried beans. I would never make these from scratch due to the insane amount of time required and the profusion of ready-made refried bean products out there, but one obviously could. Again, you want a nice pasty consistency—not too watery.
* ChicharrÏŒn. I have done my best to ignore what is actually in chicharrÏŒn, but I must face my demons sometime so here it is. I thought it was always pork skin, but the consistency of the chicharrÏŒn we got in pupusas often seemed to have a shredded thing going, so I would say use some sort of fatty porky product and you will be safe. Chop the chicharrÏŒn into a pan with chopped onion and tomato and simmer until the veggies are soft and the majority of water has boiled off. Blend the mixture into a paste. (You might start to notice a trend here with the paste thing.)
* Ayote. I never found a recipe during online searches for ayote pupusas but I would guess that it could be prepared thusly: shred some sort of squash, like yellow crook-neck or you could try to find ‘ayote’ in a latin grocery. Simmer in a pan with a little oil and salt until it is tender and much of the water has evaporated. You can probably avoid mashing this one to a paste and just leave it a limp shredded heap.

Obviously this is an insane amount of preparation to make a few pupusas revueltas. Making the fillings you wish ahead of time and then keeping them in the refrigerator makes the most sense; you can then put together a pupusa or two whenever you feel like it. I’ve only personally made the cheese ones.

(Curtido)
* Cabbage. Shred into very fine strips; I try to keep mine in the 1/8-inch width range and maybe an inch or two long.
* Carrot. Peel and coarsely shred a carrot or two (depending upon how much curtido you intend to make). You want the carrot to add a sprinkle of color to the cabbage mixture, not equal parts; a 1:5 ratio perhaps.
* White onion. Chop some onion into thin slices; proportion-wise, you want less onion than carrot.
* Jalapeno. Slice some jalapeno (to taste).
* White vinegar.
* Water.
* Fresh oregano, coarsely chopped.
* Salt.

To prepare:
Admittedly, I have not been able to get my curtido to taste “right.” I don’t know why because the ingredients seem so straightforward. I highly recommend locating a Salvadorian woman and consulting with her about ingredients and ratios. At any rate, mix the vegetables and cover with vinegar and water, mixed half-and-half. Mix in an attractive amount of oregano; enough to taste it but don’t overwhelm the curtido. Add a pinch or two of salt (to taste) and set this aside in the refrigerator overnight or at least for several hours for the flavors to blend. Taste and adjust salt if necessary afterwards; you could add a pinch or two of sugar if the vinegar is too strong. Many of the curtido jars sitting on tables in San Salvador had a yellow color, as if a pinch of tumeric was added; I never found out what this was. The approximate amount of curtido required for one pupusa varies with individual tastes but I would estimate one cup of curtido per four pupusas.

(Tomato Salsa)
* Roma tomatoes. Or you could use canned.
* Chopped white onion. Some.
* Chopped green bell pepper. Some.
* Bouillon; chicken or vegetable, etc.
* Salt to taste (watch out if the bouillon used is already salted).

To prepare:
Simmer the tomato with the onion and pepper in broth until all is soft. Blend in a blender to create a smooth consistency. You want the final result to have a consistency somewhere between V-8 and pasta sauce.

ASSEMBLY

Set up all your bowls of preparation ingredients: dough, fillings, and a small bowl of oil. Heat a dry flat-bottomed skillet to approximate pancake-cooking temperature. If you measured out the flour on a per-person basis, you might visually or physically divide up the dough with a knife so you get an even amount for each pupusa—that way you don’t end up with a runty pupusa at the end, like I always do.

Rub some oil on your hands and grab up a blob of dough, rolling it around into a ball and then flattening it slightly into a concave shape reminiscent of a giant red blood cell (pardon the metaphor). Scoop up a smaller blob of filling (you want maybe a filling center 1/3 or 1/4 the volume of the dough)—either all cheese, half cheese and ayote, half cheese and beans, or revueltas: cheese, beans, and chicharrόn. The Salvadorian ladies do not make any attempt to mix the ingredients inside the pupusa; they smear a bit of one, another, and then another filling and then get on with the forming of the patty. Having a nice paste consistency of your filling ingredients is key for smoothly forming the pupusa. Trying to keep air pockets minimal, gently close your red blood cell over the filling with your hand, turning the thing gently. Ideal is to have an even-walled ball of dough over the fillings before flattening it into a patty; the Salvadorian ladies tend to overestimate the amount of dough required, then fold it into a purse shape over the fillings pinching off the top of excess dough. Now, gently flatten the ball into your six-inch pupusa, taking care not to explode the filling contents out the outer dough.

Place it upon the grill and continue forming more pupusas. I usually cheat and use the grill to continue flattening my pupusas. Cook until the side has a mild browning—you want the heat high enough so that it doesn’t take so long the dough gets dried out but then you don’t want to burn it. Flip and finish cooking on the other side.

Serve hot pupusas with the curtido at room temperature and the tomato salsa heated slightly. The curtido is scooped over the top of the pupusa and then the salsa spooned over this. You could also put hot sauce on it as well (like Tobasco or Marie Sharp’s). You may eat it with a fork, if you must.
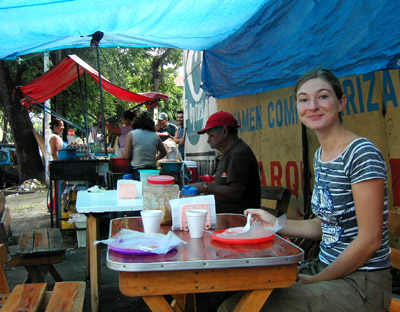
Pupusa Stand. San Salvador, El Salvador

Decidedly pleased to have some pupusas in front of me.


Let’s Cooking: Joshua’s Pork Chop

Monday, November 13th, 2006

We used to prepare this all the time when we lived on actual land. Recently, Joshua’s dad Jeff visited us on the boat and after a week of largely vegetarian dinners, a general demand for MEAT was announced by the boys. We made Joshua’s Pork Chop and, as always, it turned out pretty darned good. We never had a recipe specifying exact ingredients amounts and so we’ve always winged it—a thing that sometimes brings out the bickering on my and Joshua’s part. I have always had little regard for precision in ingredient specifications and Joshua thinks he actually remembers exactly how much of everything he put in it the last time we made it. Anyway, that’s what the wine is for.

Ingredients, more or less
* Pork! Chops of pork! I make Joshua pick these out due to an irritating squeamishness on my part around supermarket displays of dead flesh. He usually homes in on the thick ones.
* Dehydrated wild mushrooms (like porcinis); or if you are lucky enough to have fresh ones, use those. Rehydrate in hot water or broth (don’t throw out the mushroom juice when you are done though).
* White wine, maybe a half cup (sauvignon blanc, or a dry sherry—not cooking sherry either, use something you wouldn’t mind actually drinking, like a fino or amontillado. We also used Spanish brandy once). In fact, pour yourself and your cooking partner a glass in preparation for the preparation.
* Onion, chopped.
* Much garlic, sliced into little garlic sliceys.
* Balsamic vinegar (or champagne vinegar, a substance I find tastes like acetone—and not in a good way—but that Joshua loves for some crazy reason so you’ll have to battle it out on this one out). OH! I have just now received confirmation from Joshua that “Sherry vinegar’s the best.” Definitive; there you have it.
* Scant spoon of sugar, possibly. It depends upon how much balsamic you put in and how sweet it is (you can adjust for taste near the end). You might have to sneak this one in as I do for Joshua because the combination of Pork and Sugar scrambles his brain.
* Bay leaf.
* Possibly a squeeze of lime or lemon juice—again, taste it and make your decision.
* Salt and pepper to taste.

Get out your best big frying pan. Joshua is in charge of the browning of goods because he is King of the Pork Chop and so I usually just humor him on this one. Heat some oil in the pan (we always seem to use olive oil because we’re cooking Neanderthals but something that has a higher burn point is obviously preferable) and proceed to burn the shit out of all the garlic I just spent all day slicing into cute, uniform little sliceroos. Swear vociferously and demand to be handed a slotted spoon with which to fish out smoking garlic chars while I roll my eyes in I-told-you-so smugness. Luckily I always chop four extra cloves and so the process gets repeated but with a more careful eye. This time, fish out golden, crisp garlic chippy-chips from the hot oil and set aside in an attractive auxiliary kitchen dish.

Now for the pork. You must brown the pork chop; or rather sear it—a task that is nearly impossible using an alcohol stove such as we have on the Time Machine but was a SNAP when we had an antique electric stove that had only two settings: lava-red and dull brown on only one part of one spiral. Browning the pork chop, again, is Joshua Territory. I stand aside and peer around his shoulder while topping off my glass of wine. Once the browning of the pork chop is complete (be careful not to cook it all the way through, yet), set it aside for the time being.

Now, add onions to the frying pan, chopped finely and uniformly by Yours Truly and whose perfection is scoffed at by Joshua, who is simply jealous that he is incapable of such mastery of the large-bladed knife. Fight over who gets to stir. Take several sips of wine.

Once onions are well browned, a task that takes all night if you let Joshua stir because he somehow feels that the cooking process is hastened if all onions are pushed to the outskirts of the frying pan rather than spread uniformly across the center, add the mushrooms. I have to backtrack a little here: While Joshua was pushing the onions all over hell and gone in the pan, one must take a break and wind down, for example by chopping mushrooms. Remove the mushrooms from the reconstituting liquid and chop finely (I do this because the mushrooms I use are often the Trader Joes “wild” mushroom mixture and so I try to marry random mushroom flavors as best as I can). Add this to the onions in the pan and let Joshua do what he will with them while you spring into action. SPICES! Chuck in a bay leaf! Pour in the remaining mushroom juice! Grind in some pepper! Add a splash of balsamic vinegar and tell Joshua it was his favorite champagne vinegar that you threw out four months ago! Toss your own glass of wine in the pan! Sneak a taste of the sauce so far. Distract Joshua’s attention (“LOOK! A condor!!”) whilst adding a smidge of sugar to the mix if it tastes a bit off; seize control of the wooden spoon to mix this around. I believe I’ve been known to add a pinch of thyme to this as well.

More wine. For you.

Now, add the pork chops back to the pan and reduce the heat to simmer. I generally see to it that each chop is carefully covered with a blanket of mushroom/onion mixture and that they are neatly arranged in the pan to finish cooking. This generally doesn’t take too much longer (five minutes, maybe) and while they finish up, you may cover the pan or leave it uncovered in order to reduce the sauce to an appropriate amount. Taste and adjust salt/pepper as you like. Add a squeeze of lemon or lime juice if it isn’t as tangy as you might like.

When they are finished (Joshua cuts into one and when the center is just a teeny bit pink, calls the cooking process done), remove from heat and serve, spooning the mushroom/onion mixture over the top with the juice. Sprinkle the garlic chips on top of this creation. We generally make a salad to go along with this. A Caesar salad, perhaps, using actual lettuce. Ohhhh. Good stuff.


Bitchin Sierra Ceviche

Sunday, October 22nd, 2006

Joshua seemed to remember in Mexico hearing that sierra was an excellent fish for ceviche. I don’t know why, but I was skeptical about whitefish in ceviche after having some rather chewy snapper once; previously, I had only had tuna ceviche, or else various shellfish.

At any rate, we had caught a modest-sized sierra directly after we hung a left from Bahia del Sol and still had a bit left over after a day or so. Joshua used the remainder for a ceviche snack and damn was it good. Those Mexicans weren’t kidding; sierra is indeed a perfect ceviche fish. We all but inhaled the batch and pined for more.

Sierra mackerel
More. Caught right around the border of Nicaragua and Costa Rica. It can be clearly seen that this fish is about the size of Joshua’s leg, in spite of the reckless camera angle. He carefully filleted the thing to produce nearly an entire one-gallon freezer ziplock full of fish meat.

With eight pounds of fresh sierra, we could make a truckload of ceviche.

SIERRA CEVICHE

* Eight pounds of FRESH sierra. No, really, you don’t need that much. But it’s a mighty powerful feeling to have it, I tell you.
(Veggies)
* Onion, finely diced; at least, I like to finely dice things.
* Tomato, finely diced.
* Garlic, finely diced.
* Green pepper, sliced into ~¾-inch long juliennes. (For the hell of it.)
* Jalapeno, finely minced. Of course, El Salvador does not deal in vegetables that contain any perceptible spice so sadly, this ingredient was absent for our Santa Elena ceviche.
* Avocado, chopped into reasonably sized chunks.
(Irritants)
* Lime juice (I don’t need to mention that this needs to be fresh.)
* Vinegar, we used sherry vinegar; red wine vinegar would be good too (we were low on limes; the V was fine)
* Water.
* Salt
* Spices if you want: pepper or a bit of cumin.
* Cilantro for garnish. I sadly didn’t have any.

The moment the anchor was down I was in the galley happily waving knives at our veggies. I tend to prefer a lot of vegetables in things so I minced a healthy amount of onions, tomatoes, garlic, and peppers; save the avocado for last. I chucked about a quarter of a teaspoon of salt into the blend as well. (Also, I seem to remember reading someplace that one isn’t supposed to use metal bowls or metal utensils when preparing acidic things like ceviche.)

Sierra Ceviche
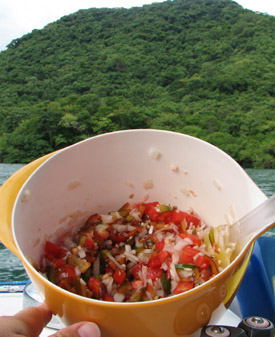
Somehow the photo-taking process broke down after I got the veggies chopped so this is the last illustration. At any rate, here’s a lovely shot of freshly diced veggies shown against an exotic backdrop of authentic Costa Rican jungle.

Then, I called Joshua down to deal with the raw meat part of the deal. He carefully sharpened the knife (because sharp knives are a joy to use) and sliced a reasonable amount of fish into half-inch cubes (bigger pieces would take longer to cook and we were hungry).

Now to add the acids that will “cook” the fish and mellow the onion/garlicy parts; basically, you want enough liquid to just cover the lot. The ratio we found works is roughly 3/4 lime juice, 1/4 vinegar (if you have enough limes, all limes are generally preferred I think–particularly if US-bought limes. The limes we had were acidic demons and I think the addition of vinegar mellowed things a bit). Mix this around and let it stand for around fifteen or twenty minutes (or however long it takes to cook the fish). Once the fish is cooked, taste it and adjust your flavors, adding more salt if necessary, pepper or cumin if you want, or more fresh lime juice. If it tastes a little too piquant, you could add a tiny bit of sugar to mellow it out a bit; we only need to do this if we went overboard on the lime juice or vinegar. Now add the chopped avocado, carefully mixing it into the ceviche so it doesn’t disintegrate. If cilantro kept worth a damn, I would have minced a bit to sprinkle on top.

We ate it on crackers with a dab of Marie Sharp’s habanera hot sauce. Cold beer, of course, goes brilliantly with this. Luke-cool beer will do in a pinch.


Let’s Cooking! Chanterelle Pasta

Thursday, August 24th, 2006

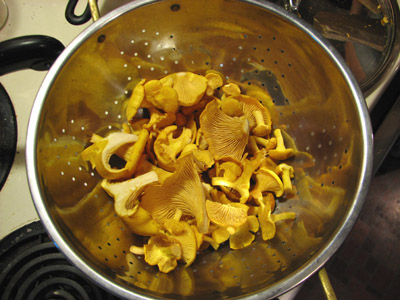
Maine Chanterelles

Kurt’s mom sent us on a hike off someplace in Maine to a fire tower where the blueberries grow. If we were good little bunnies and didn’t eat all the berries, there would be a pie in our future. Kurt was armed with some plastic grocery bags. We parked the car, chatted with the previous hikers (“Absolutely gorgeous! You’ve been here before right? Such a great day for it!” etc.), and made it about thirty feet into the path before Joshua got his mushroom eyes on and spotted some chanterelles glowing from the forest. Joshua and I turned into raving lunatics and bolted off into the underbrush to collect. The glory of discovery lasted around thirty seconds unfortunately and I had to bolt or be consumed entirely by mosquitoes. I sprinted back to the trail to pace around with Kurt until Joshua emerged, a wild look in his eye. Chanterelles! In Maine! Who knew; it had been so long since we had found the little guys, and this variety was very similar to the variety you find in Oregon rather than in California (a much superior variety in our opinion—petite, fragrant, and clean). We were pretty excited. Kurt and I continued on (we were on a hike, after all) while Joshua darted off the path here and there every time he thought he saw something. And we kept finding more chanterelles; before too long we had amassed almost one plastic vegetable bagful, probably three pounds. We never found any blueberries; I guess it just wasn’t the right season.

What to make. What to make…

Answer: Pasta with Chanterelle Cream Sauce.

What you need:

Pasta. We used a sort of large unbent macaroni that wasn’t penne. I’d probably choose farfalle if I had to pick one type out of thousands.
Bunch of chanterelles which you picked fresh the same day after going on a lovely hike that had a view but no blueberries.
Olive oil.
Butter. What, did you think this would be a healthy recipe?
Cream. Get a big thing of it just in case. You can always use the remainder to put on coffee or mix with cream soda for a delicious snack.
Chopped pecans.
Garlic. Think sublime; too much garlic tends to overrun chanterelles. You want the garlic smished.
Chervil which you picked fresh from your herb garden. (Oh right! 1. Plant herb garden. 2. Go chanterelle hunting…) Chop it finely.
Salt and pepper. Al gusto.

How to do it:

First, you need to clean the chanterelles. This involves cutting off the ends of the stalks and brushing off the dirt (a paintbrush works if you don’t already have one of those froofy mushroom brushes). It is best to not clean them by washing because mushrooms will absorb water like crazy and soggy chanterelles pretty much suck. Use water only in extreme emergency. Also, cut out any weird sections (burrowing insects or slug slime, depending upon how squeamish or protein-hating you are), double-check your species, etc. Then slice into thin sections.

Dry sauté the mushrooms. Chanterelles have a lot of water in them even if you didn’t wash them and if you just start cooking with them without releasing some of it, they just end up soggy. Get a dry skillet hot (so water droplets dance around) and toss in the mushrooms. Add a bit of salt to help them release the water if you want. Stir around a bit and pretty soon they will start releasing a shocking amount of yellow liquid. They will also smell really good. Pour off the liquid and reserve and continue stirring them around until they stop releasing water more or less and the rest of the liquid has evaporated. Take mushrooms off burner and set aside. I chopped them finely for our cream sauce (you could leave them in slices or even puree them with some of the cream depending upon what texture you want.)

Put pasta on to boil.

Heat up some oil and butter in the skillet; add garlic and after a moment, add the chopped pecans. Toss these around in the oil until the pecans are a nice toasty consistency (I’m a pecan novice—I just tasted them to see if they were all crunchy and buttery and called it done); don’t burn the garlic either. Add the chopped chanterelles and toss around in the butter/pecan/oil/garlic. Now stir in the cream and reserve mushroom broth. We added enough cream to make the sauce look ‘right.’ (If you are looking for a smoother sauce consistency, you would need to set the pecans aside before adding the mushrooms, puree the sauce, then add them back in last—or sprinkle them on. Or puree them too. Whatever.) We let the sauce simmer very gently for a few minutes then called it done. Adjust the taste with salt and pepper.

Put pasta in your preferred serving bowl and pour sauce over it. Sprinkle chervil on the top to make it look pretty. Lamely, we did not manage to get a photo of the finished product.


Cheyenne Weil, Joshua Coxwell