Project Sun Shirt
June 30th, 2008 by: cheyenneSo we were headed to Santa Barbara, where there is sun, and I was paranoid about Ronin’s perfect fair delicate soft sweet skin. I had read that you are not supposed to use sunscreen on infants less than six months old so I thought I would make a lightweight shirt that would cover her arms yet be cool in the event that it was actually warm in Santa Barbara too.
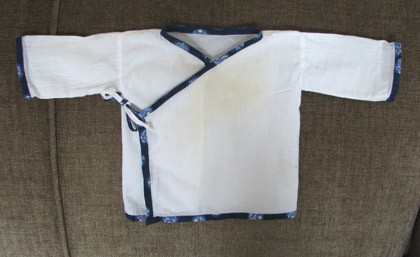
[Here’s the stupid part: note the yellowish smudge front and center; I did this with the iron today as I was ironing the shirt nice and smooth for this photo session. I suggest you not be like me and never iron anything. Ever.]
I dug into the bag of fabric scraps I’ve been hauling around with me for fifteen years, packing them up and unpacking them again through approximately thirteen separate moves. I believe I’ve had the white fabric the entire time and have only now used it for the first time. I have no idea where I picked it up actually. Anyway, I knew back in ’92 that it would come in handy some day.
I didn’t have a pattern and only a rough idea of what I wanted to make so I took out a shirt that fit her loosely and measured it for width, height, and arm length. And by “measure” I mean I made a mark on a sheet of paper using my fingernail. My only requirement was that the pattern be so simple I could feasibly complete it in random 20-minute intervals over the next three days without tearing my hair out in frustration.

[I know it’s hard to read; you can click for a larger image.]
Because the fabric is not stretchy, I gave it an inch or so here and there. It looked enormous really and I double-checked my (cough) measurements to be sure but I was still pretty much sure I was screwing something up.
First I sewed the arms into tubes. This was easy. Then I trimmed them by an inch or so because they seemed really long (in the end they turned out a tad shorter than what I had in mind; oops).
Then I laid out the torso folded in thirds, eyeballed the V crossover in front and cut it out with scissors. I also gave the back of the neck a bit of a scallop instead of leaving it straight across.

Next I sewed the top of the torso (the shoulders). I cut holes (carefully!) in the sides where the sleeves would fit.
Fitting the sleeves was sort of tricky. You have to stick the sleeve inside the hole in the body and carefully sew it up so that it doesn’t pucker or look like a total Neanderthal did it. Also, you have to be sure to orient the sleeve properly with the body so that, you know, both finished sides end up on the same side of the shirt. Seems obvious but I screwed this part up. Twice.
I felt doubly like a moron because I actually thought long and hard about how to keep this from happening. Here’s how to not be like me:

I made some seam binding out of some other material I had lying around. (This material had only been taking up space in my basement since last November.) I measured the lengths I needed (two for each sleeve, one for the neck opening, one for the short side flap piece, and one for the bottom) and cut strips about 1.25 inches wide. (I made the neck binding on a bias and the rest of the pieces regular.) I ironed the strips in half and then ironed the ends tucked under so that it would be easy to fit it together on the shirt for sewing. Then I sewed it all on.
We went to Scrap a couple of months ago, which is a store of weird scraps of odd crap (pieces of tile samples, poster board decked out with seventh grade science projects, plastic containers with some corporate logo on them, wedding invitation misprints, a bin of razor blades—no joke, etc.) and they had a bin of leetle sew-on snaps and I was overcome with how cute they were and thought I should buy some just because, hell, who knows, they may come in handy in thirteen years. But I didn’t get them and when I made this shirt, I was sorry. Instead, I scrounged some old buttons from my mom’s old sewing kit (so, I’m guessing they were probably 35 years old) and, since I didn’t have a zig-zag stitch on my machine, I braided little loops out of embroidery thread to fasten the buttons down.
For the side flap, I made a couple of ties (my loop-button situation was not very attractive) to secure the front flap. It looked huge sitting on the bed next to my little baby but it fit her perfectly. I hope it lasts the summer.


June 30th, 2008 at 8:31 pm
That is so cute! Can you make one for me :) Hey, whatever happened to the phone call last week? I thought I’d leave it up to you since you’re the one with the tricky time schedule. I’m all for going to Eugene instead if that’s okay. I may fly into Portland and ride down with you though. It looks like it’s cheaper that way. Anyway, give me a call and we’ll hammer out the plans. I am working Tues. and Wed., so if you call these nights, call after 8pm. Talk to you soon!
July 1st, 2008 at 6:31 am
Cheyenne—what an adorable shirt! Ronin loves wearing it, I can tell. Maybe one of those Clorox spray bleach bottles would work with the little scorch mark. Aaiieee! I would have WEPT big tears if I ironed a scorch after all that work. Ronin is such a fashionista! Congrats on another couture breakthrough. —love, Mom