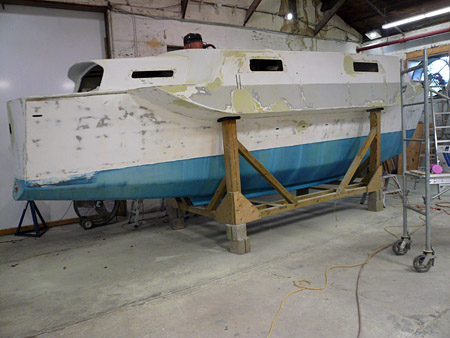
Lamely, I have not been regularly updating the blog like normal. Joshua has been posting filler photos hoping nobody will notice. This past week and a half have been consumed utterly with the Family Reunion, and we have averaged maybe 35 minutes of waking time at Joshua’s dad’s place per day. So, updates have been largely nonexistent. Before the family reunion, we were doing boatwork!
THE BOATWORK
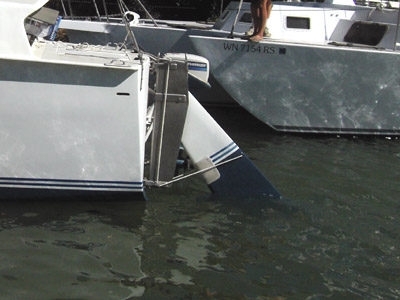
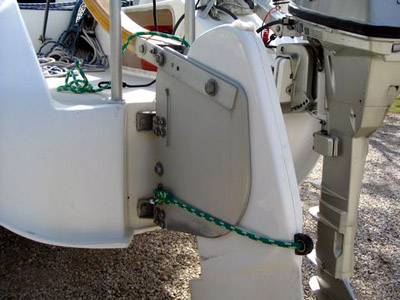
Rudder. After dragging the boat up onto the lawn at Jeff’s house, we promptly removed the rudder and broken gudgeon. And kind of stared at it for a moment. Then we decided that maybe we’d work on some other projects first. A month later we still haven’t done any work at all on it; it has just been sitting in the breezeway under the house being largely ignored, I mean, where it can dry out thoroughly. The rudder itself isn’t really that big of a deal, we are still just sort of pissed off at it. There is a small section on one edge where the fiberglass is cracked and so we’re going to cut that away, epoxy, sand, re-glass, sand, epoxy, sand, epoxy fair, sand, and paint it. A lot of work for such a small spot. That’s usually how it goes.
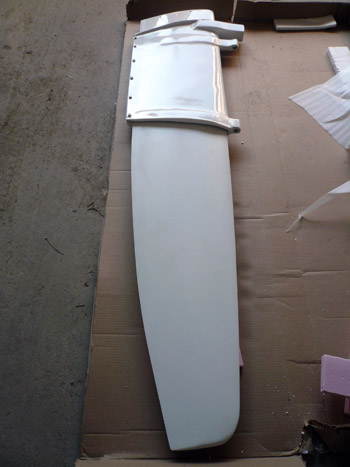
Also, the infamous broken gudgeon. John Williams, the owner of Gimme Samoa, is chief engineer on a 900-some foot container ship and he generously offered to weld up a new piece for us during idle hours between Hawaii and Southern California. This was a deal we could not pass up. We just got the new part in the mail and are have been fighting over who gets to sleep with it at night, it is so BEAUTIFUL!
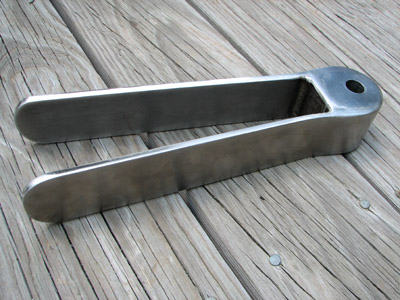
Behold the splendor. John did an awesome job and we are so happy!

Compare to the old part we had hacked together for us in Guanaja. The ends are totally sheared off (where the double arrows are); this happened during the Gulf of Mexico crossing but we had it lashed to the rudder through those little cheek blocks. This was a sketchy situation though because the rudder knocked around inside the part, widening the legs and threatening to rip again where I have a single arrow, and where it had ripped three times already. We knew the area must be pretty brittle.
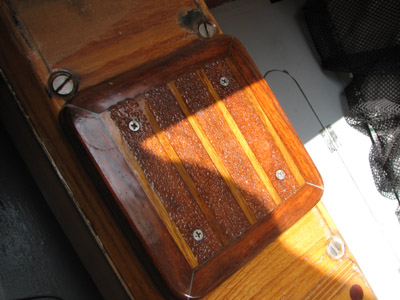
Centerboard.
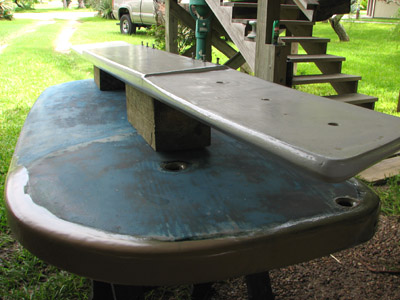
[Centerboard below with fairing epoxy ready for sanding. Again. A freshly-painted aca is balanced over it.]
When we first bought the boat and were sailing it down the Sacramento River to the San Francisco Bay, we had a minor anchoring mishap. After chucking the anchor overboard while pointing upwind, we dutifully attempted to reverse downwind to set it; however, the opposing current was so strong that we were spun around in a circle, running over our anchor line and wrapping it around the centerboard, which we forgot to raise before anchoring (oops). The damage was a one-inch notch in our centerboard, which we patched up “temporarily†with some Splash Zone-like epoxy putty hoping it would stay put. It held out for a very long time, until a few months ago actually, when we accidentally did the exact same thing, popping the epoxy right back out of that notch. We figured it was time to remove the board and repair the notch for real and see if there was any other damage. We dug a hole under the boat and dropped the board out from underneath. Like the rudder, there were some cracks in the fiberglass along the leading edge of the board so we ground it all off, did the whole sand/epoxy/glass/sand/etc. number, and now we just need to paint the thing. And put it back up inside the boat, which I seem to remember being much more difficult than removing it the last time we did this…
Acas. All four of the acas (the cross pieces—not the A-frame structural bits) have fiberglass cracks. They are pretty minor, but they look ugly and are one of the first things you notice when climbing aboard the boat. To fix them, we just need to remove them (one actually, Jeff fixed without taking it off the boat at all), grind/epoxy/glass/sand/fair/whatever to fix the cracks, then repaint and replace. Unfortunately, with the boat sitting out of the water, we are afraid to remove more than one piece at a time (in case the boat torques a little and we can’t get the bolts back into place). This is a pain in the ass in that we must do each one separately, one at a time. We just finished the paint and have two to go.
Hatch Covers.
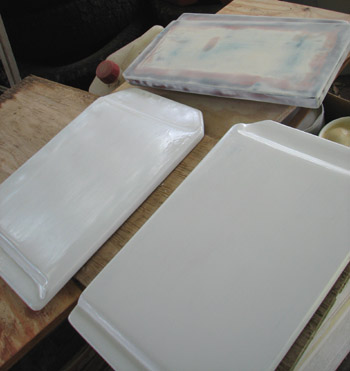
The lazarette covers in the very bow and stern of the boat had major fiberglass crackage and were in general, hugely ugly and in danger of rotting. We removed them, did some prying and grinding to get rid of some of the totally gross glass and layer of rotting wood underneath on the edge and then wondered if we should just start from scratch constructing new ones. After realizing that this was probably a lame idea (the wood was fine everywhere else—just not on the edges), I removed the remaining glass from all edges, ground off all soft wood, and peeled up any sort of delaminating bits, wedging shims underneath so the air could get in and dry it out. Then I laid them out in the sun for a week. Once they were satisfactorily dry, we re-epoxied down the good-condition glass on the tops of the boards, then reglassed all four edges of all the hatch covers. This took about a million years. Much sanding and exoxy fairing and foul language later, they look better than I think they ever have and are ready for paint. Um, all except one set, which we sort of forgot to check for size after I ground away soft wood on the edges—we need to make them a little wider (only 1/8 inch but still, what a hassle); I think we will just add some more fiberglass layers, refair it, and call it good.
Varnishing.
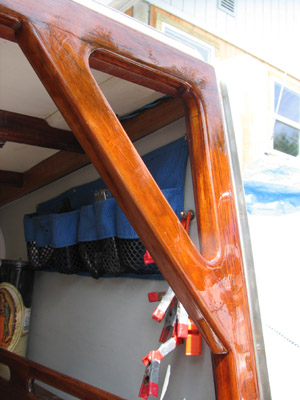
[So. Shiny.]
The companionway handles used to be lovely varnished glowing wood; however, after two years of rubbing sweaty hands covered with deet and sunscreen over them every time we got in and out of the cabin, the varnish was goopy and the handles were darkened and ugly. In addition, there were a couple other little pieces of wood (like in front of the sink) that had some varnish rubbed off. I removed these, sanded off all varnish entirely, then clear epoxied, sanded, and varnished them. I ended up painting four coats of varnish in the end, although I had intended to only do three (sanding between coats gets old fast). Unfortunately, right after I painted the supposedly third and final coat, the wind shifted, upsetting a large amount of fresh sawdust from the upstairs construction. This swarm of sawdust navigated down the stairs, circumnavigated the house to the downstairs breezeway, and evenly coated all my wet varnish. I couldn’t believe my eyes when I saw it. After much grumbling, I finally drove my pile of sticks to Tucker’s house to do the new final coat in his garage. They are back in place in the cabin and look really really nice. Varnish is a wonderful thing.
Minikeel. There was a three or four inch crack in the fiberglass in the minikeel. We weren’t sure if it was a small or large issue but figured it ought to be ground it away to make sure the wood underneath was still good. Grinding was interesting in that we discovered a little pocket of water under the glass but we also found that the wood underneath was still totally solid. Joshua ground away a huge swath of glass maybe three feet long on both sides to make sure there weren’t any other hidden water hidey holes and we let this dry out for a week or so. Joshua then laid new glass over the whole area. It now needs a final sand and paint.
Beneath the minikeel was a wormshoe. This is a piece of wood, usually unfinished but in our case, neatly glassed and painted with beveled edges, meant as a sacrificial snack for would-be pests and boring critters. We pried the remains of this gnarly bit off with a crowbar and trashed the thing. It was fully rotted out and perforated with holes. Wormholes, presumably. The minikeel was in excellent shape (aside from the glassy bit above I mentioned) so I guess it did its job.
Catwalk Supports.
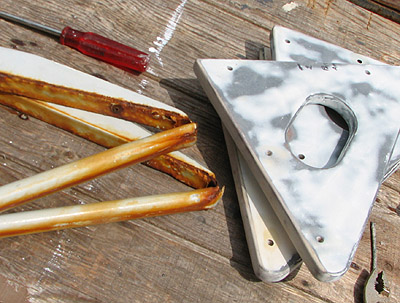
[Just in case you weren’t sure, the old pieces are on the left, bleeding rust. The new pieces are faired and ready for paint.]
These were originally made from ferrous metal and then painted to stave off rust. Clearly, this did not work out so well and the rust had oozed orange stripes down the boat. Finally, in the last couple of months, they rusted through completely and needed to be replaced totally. Joshua’s dad decided he would make new ones from scratch from plywood, so he partook in the cut/sand/epoxy/sand/fair/sand/drill holes/epoxy/etc. fun. They are ready for paint now and are looking great. I’m particularly happy that they will no longer drip nasty gunk down the boat. There is a product called “Sno-bowl†(like Tilex) that was recommended for the rust stains and it worked great! (We were highly skeptical that the stains would come off.)
Cockpit Seat. There was a tiny hole in the drainhole of the cockpit seat and eventually, this leaked water into the seat and delaminated the fiberglass (and possibly the plywood). We decided to add a hardwood support underneath, drill holes into the top of the seat to dry it out, then inject it with penetrating epoxy and regular filler epoxy after. I made a piece for the support and drilled a zillion little holes in the seat. About three days later, right around the time it was nearing bone dryness and was about for filling, it began to rain. We freaked out, blue taped up the holes as best as we could, and rigged a tarp over the area to keep the water off. Unfortunately, when it rains here, it comes down either sideways and upside down or as a solid lake—and it tends to last for days on end. In this case, about seven. Water got on the seat. Water mocked my blue tape and got in my holes. CRAP!!
To make a long story short, the seat is drying out once more. We’ll hopefully get to it soon here. Hopefully it won’t rain for a few days.
Bottom Paint. Joshua sanded the bottom and it’s essentially ready for paint when we are ready to apply it. I plan to tape off the main hull adding a couple of inches to the water line. When we were traveling and loaded down, the line was exactly at the water level, which made us feel fat. When empty, of course, the main hull has around three or four inches to spare.
Misc Leaks. There are a couple of drippy drips that happen when it pours outside. One is forward where our running light sits—we need to goop that sucker up with some marine silicon. Also, checking the windows might be a good idea before we leave the boat. We also have a leak from the boom track, which will require us to remove it, dry it out for a day (if necessary), re-goop and bolt the thing back down. We were procrastinating on these minor tasks during the nice weather and then of course, we couldn’t do anything when it was raining…