Archive for the 'baby projects' Category

New Crib

Saturday, November 8th, 2008

Painted crib

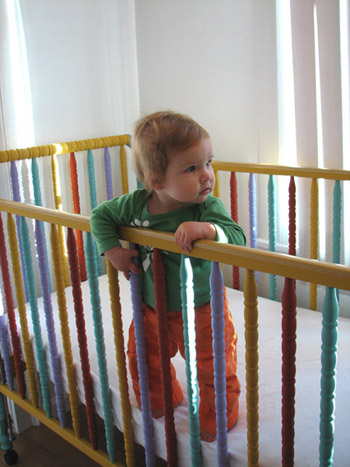
It should have happened months ago but finally tonight, Ronin is in her new crib, in her own “room.” Of course, by new, I mean a used Craigslist crib, and by own “room” I mean the hall/entry way of our apartment, which we have cleared of crap (i.e., stacked it in the hall outside the apartment) and placed said crib, a couple of butterflies I picked up off the ground in Central America and framed, and soon-to-be little dressers in which to store all her wee little shirts (IkEA, but we haven’t yet assembled them because all that crap I mentioned presses on the brain in such a way…).

And she is pretty much hating it. She sacked right out at 6:30 because that’s when she normally crashes but was up by 7, fussing and sitting up. Soon she was all out crying and we tried to get her to settle back down but within five minutes, she was hysterical. Anyway, it took until 9 to get her to fall asleep for more than 5 minutes in a row and we’re going on 20 minutes now and holding our breath and typing really quietly out here in the living room. And drinking (nigori).

Anyway, about the crib. We found one that wasn’t HORRIBLE on Craigslist and I emailed the person who was selling it and fine it was mine but then she emailed back saying she had to clean out her garage to get to the crib. Then when she cleaned the garage, she couldn’t find the hardware. So she was going to drop it by my place because the hardware was certainly just in the kitchen drawer and she’d find it in the morning. Then she had to go by Home Depot to get more hardware because she couldn’t find the old stuff (she knew what it took) but was still going to drop it by. Then a couple of weeks went by. Then we bought a different one that was really cheap because it was really ugly. BUT, painted, it would be really cute. A project! OH YEAH!

Well, anyone who has ever painted anything ever even once in their lives (this includes us) would have been able to tell us that not only would those spokes be a bitch to sand, but it would be a bitch times 54. Because that’s how many hard-to-sand-not-to-mention-paint-GAH spokes there were.

It took us over a month to get it done.

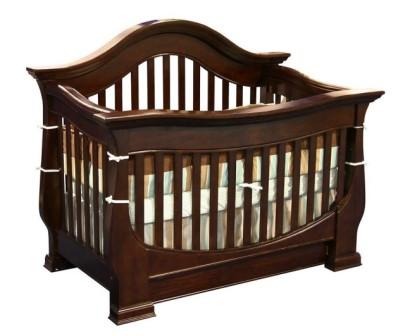
But it looks awesome.

Ronin spider

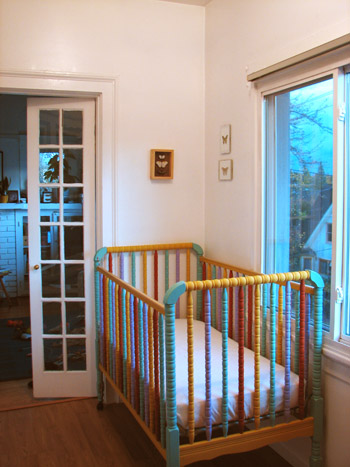
[Looks almost like a “real” nursery.]

And Ronin so far hates it.

Sigh.


Ay-dah

Monday, August 11th, 2008

It would seem that six months marks a trying time for helpless babies and their bleary-eyed counterparts. I’m talking about everyone’s favorite topic: sleep. Sleep and Ronin are at odds lately. Sleep and Ronin have a on-again, off-again relationship and this relationship is on the rocks. Sleep and Ronin = LAME for EVERYONE.

(Me = cranky.)

There is a lot of advice out there regarding how to get your baby to sleep. Everyone is a baby-whisperer. I think the sleep advisers are more prolific than the how-to-be-pregnant people. At any rate, one bit of advice was to introduce a “lovey,” or some sort of item to be loved up/devoured by mucous alone (stuffed critter, blanket, paper bag, wire whisk, etc.). I decided a stuffed critter was the element missing from my child’s sleep psyche.

NO MORE! BEHOLD: “Ay-dah!” (Ronin named her.)

God isn’t that the cutest thing? I totally stole the idea from some crafty type and made my own version out of some of some of those fabric scraps I’ve got on hand, one of my pregnant sweaters that is now too wanged out to wear, and an old Irish flannel shirt I’ve been carrying around since high school.

Warning: video somewhat grandparenty.

[flash /images/0808/RoninPlays.flv w=400 h=300 f={autostart=false}]


Project: Baby Carrier

Friday, July 18th, 2008

I think Ronin had a growth spurt at six months. The books all say that babies are supposed to but I didn’t really believe it. Somewhere between five and a half and six months she suddenly became too heavy for the Baby Bjorn. Not too big or technically too heavy (according to the weight capacity), but after only a mile or two walking with her in it, my shoulders would KILL. This never happened before; I used to walk for hours and I never noticed it being a problem. I had been using the Bjorn a lot since it got warmer out; the Moby, which is of course very comfortable even with a heavy baby, is just too hot for summer. Ronin gets sweaty and starts to squirm and struggle to get free after a while.

The answer, of course, was to search endlessly on Ebay and Craigslist for a cheap used Ergo or something but then I saw an online tutorial to sew a Mei Tai, which is similar to the Ergo but lower tech, which I prefer. Everyone swears by the Ergo and similar styles, particularly for heavier babies and toddlers, so I decided to make it.

It was really easy and this was good because I needed to get it done in a couple of evenings so we would have it for the Country Fair. The hardest part was picking out the fabric. I needed something strong and had been told to not use twill (because it might bunch up uncomfortably but in hindsight, I don’t think the design I used with the padding would make this much of an issue) or denim (too short of a pile makes the fabric weaker) or corduroy (again, chopped pile compromises strength). So, I needed canvas or something like this. We went to Johann’s Fabrics, which is the size of a city block yet ironically has hardly any fabric. (If I was looking for stenciling or scrapbooking materials, perhaps this would have been my place.) Unfortunately, they did not carry canvas, only an insanely heavy cotton duck, which was severely stiff and thick. I was sick of looking and picked the khaki color (color options were also less than desirable). The stuff was so stiff the tweaky Russian salesgirl was unable to fold it and just stuck it in the bag in the shape of the roll it just came off of. Washing it at home helped a little but this was very tough stuff.

I made essentially the same carrier as the tutorial instructions show but left out the inside liner (I could not decide upon a suitable liner fabric and of course, Johann’s Lame Fabrics was no inspiration) and the hood. I also made the padding from folded fleece but used only 18 inches and started the padding a couple of inches up from where the straps attached to the body.

Overall, I’m very happy with it. It looks good I think and it really is very comfortable. We broke it in at the Oregon Country Fair, arriving at around 11:30am and leaving at 8pm—I wore her the first half of the day, Joshua for the second and my shoulders felt fine. My back felt fine. It was great. Plus, as always, it was hot and dusty yet the carrier was not uncomfortably hot; the baby can sort of lean away from you creating a breezeway between you two. Unfortunately, Ronin is used to facing out and seeing where she is going. This carrier is only a facing-you carrier (either in front, or piggy-back style) and Ronin was a tad put out about having to always look to the side. We bought some wooden beads on a rope to wear around our neck and thusly we rocked the fashion boat at the Fair AND the baby was happy and distracted. Also, bonus points: she slept marvelously in it. Just made humming noises until she drifted off.

Since then, we have had a couple of long walks and she is becoming more content to ride in the carrier and look to the side. I haven’t tried her out on the back yet; I’m going to wait until she is a bit bigger I think. There is a hip carry I tried out yesterday and this is the answer as far as Ronin getting to see where we are going. It is somewhat less hands-free than the front carry but cuddly and comfortable and Ronin seems much happier.

Things I would change a second time around are 1) Use a lighter weight fabric (the duck is fine, but it is seriously overkill). 2) Rearrange the exterior decorative layer. I made a square inside a frame of khaki; next time I would make the decorative fabric run in a stripe down the body with khaki only at the sides. 3) Make the hood. I like the looks of the hood (also it would support her head when she slept and provide shade) and with the body styled as a stripe, the hood could be incorporated easily without breaking up the design. I also would make the hood longer than the tutorial depicts with the sides gathered more like the Ergo hoods. 4) Make loops here and there to tie or attach things to, like toys or teether doo-dads. 5) Contour the sides more so that it doesn’t chafe under her knees. When she is a tad bigger it won’t matter but for a smaller baby, the body bunches up a little where her legs stick out.

[Here’s a diagram of what I made and what I would do to improve on the design. As you can see, it is really insanely simple. The green panel is where I would sew in some fancy pattern or whatnot rather than a square in the center and the gray shaded areas are where the padding is. The shoulder strap padding goes about 18 inches up the straps. A hood could be added made with the same fabric as the designer stripe and would appear low relief as it hung down when not in use. I forgot to mention or put it in the diagram but the body fits inside the bottom strap about two inches so that there are three lines of stitching securing it (top stitching in addition to the two lines of stitching securing the padding).]

[This is a photo of the sewing machine I use. It was given to me when my grandmother died and I use it a lot. It only has a straight stitch (which is why I avoid buttonholes when I can) but it works beautifully and is so small and cute. I love it.]


Project: Stuffed Toys!

Friday, July 4th, 2008

My brilliant idea was that instead of buying one of those baby play gyms with the themes like “Rainforest Wonders” or “Noah’s Ark” that have the stuffed animals hanging for the baby to bat at, I would make my own little stuffed animals using some bright and compelling fabric scraps I had on hand (I have a lot of compelling fabric scraps on hand, have I mentioned this before?).

I was thinking I could put bells inside some of them—maybe some sort of rattley thing—or even try to find some of that crinkly plastic and stuff one of them with that. Oh, I was full of lofty ideas. In the end, I axed the idea of bells and crinkly plastic, drew some simple shapes on a piece of paper, and then cut it out for patterns. I figured, the simpler, the better and most importantly, the more likely I was to actually complete this project.

I chose a bird, a rabbit (yes, it’s really a rabbit and his name is Mr. Bun), and an octopus. My theme was “Things That Exist.”

[Or possibly, don’t.]

Cutting and sewing the critters together was pretty simple and I left an inch-long hole in the bottoms of each for stuffing. My plan was to embroider some minor detailing (I’m NOT an embroiderer and so any embellishments needed to be fairly simple) but in my excitement to have something that looked sort of almost done, I got ahead of myself and stuffed all of my critters before embroidering. Then I went back and tried to embroider the details on the bird. Embroidering on an already stuffed animal is totally stupid and I don’t recommend it to anyone.

I sewed up the bottom of the bird (and did a pretty crappy job of it too) and presented it to Ronin.

She really liked it! She immediately squished it and hugged it and then started sucking on its head.

After a while I noticed that as Ronin worried the bird, individual strands of stuffing were working their way out of the fabric. I pulled them out and gave it back to her but again, after a while, fine strands were poking out again. I finally took the bird away from her and hung it up on the activity bar that goes over the bouncy seat. She stared at it longingly. I felt really bad.

So… I’ve decided to make her another bird, this time I thought I’d use wool fuzzy stuffing that you get at the schmancy yarn and felt craft store. She’ll be allowed to swallow this one whole if she wants, all parts will be 100% biodegradable and all that good stuff.


Project Sun Shirt

Monday, June 30th, 2008

So we were headed to Santa Barbara, where there is sun, and I was paranoid about Ronin’s perfect fair delicate soft sweet skin. I had read that you are not supposed to use sunscreen on infants less than six months old so I thought I would make a lightweight shirt that would cover her arms yet be cool in the event that it was actually warm in Santa Barbara too.

[Here’s the stupid part: note the yellowish smudge front and center; I did this with the iron today as I was ironing the shirt nice and smooth for this photo session. I suggest you not be like me and never iron anything. Ever.]

I dug into the bag of fabric scraps I’ve been hauling around with me for fifteen years, packing them up and unpacking them again through approximately thirteen separate moves. I believe I’ve had the white fabric the entire time and have only now used it for the first time. I have no idea where I picked it up actually. Anyway, I knew back in ’92 that it would come in handy some day.

I didn’t have a pattern and only a rough idea of what I wanted to make so I took out a shirt that fit her loosely and measured it for width, height, and arm length. And by “measure” I mean I made a mark on a sheet of paper using my fingernail. My only requirement was that the pattern be so simple I could feasibly complete it in random 20-minute intervals over the next three days without tearing my hair out in frustration.

[I know it’s hard to read; you can click for a larger image.]

Because the fabric is not stretchy, I gave it an inch or so here and there. It looked enormous really and I double-checked my (cough) measurements to be sure but I was still pretty much sure I was screwing something up.

First I sewed the arms into tubes. This was easy. Then I trimmed them by an inch or so because they seemed really long (in the end they turned out a tad shorter than what I had in mind; oops).

Then I laid out the torso folded in thirds, eyeballed the V crossover in front and cut it out with scissors. I also gave the back of the neck a bit of a scallop instead of leaving it straight across.

Next I sewed the top of the torso (the shoulders). I cut holes (carefully!) in the sides where the sleeves would fit.

Fitting the sleeves was sort of tricky. You have to stick the sleeve inside the hole in the body and carefully sew it up so that it doesn’t pucker or look like a total Neanderthal did it. Also, you have to be sure to orient the sleeve properly with the body so that, you know, both finished sides end up on the same side of the shirt. Seems obvious but I screwed this part up. Twice.

I felt doubly like a moron because I actually thought long and hard about how to keep this from happening. Here’s how to not be like me:

I made some seam binding out of some other material I had lying around. (This material had only been taking up space in my basement since last November.) I measured the lengths I needed (two for each sleeve, one for the neck opening, one for the short side flap piece, and one for the bottom) and cut strips about 1.25 inches wide. (I made the neck binding on a bias and the rest of the pieces regular.) I ironed the strips in half and then ironed the ends tucked under so that it would be easy to fit it together on the shirt for sewing. Then I sewed it all on.

We went to Scrap a couple of months ago, which is a store of weird scraps of odd crap (pieces of tile samples, poster board decked out with seventh grade science projects, plastic containers with some corporate logo on them, wedding invitation misprints, a bin of razor blades—no joke, etc.) and they had a bin of leetle sew-on snaps and I was overcome with how cute they were and thought I should buy some just because, hell, who knows, they may come in handy in thirteen years. But I didn’t get them and when I made this shirt, I was sorry. Instead, I scrounged some old buttons from my mom’s old sewing kit (so, I’m guessing they were probably 35 years old) and, since I didn’t have a zig-zag stitch on my machine, I braided little loops out of embroidery thread to fasten the buttons down.

For the side flap, I made a couple of ties (my loop-button situation was not very attractive) to secure the front flap. It looked huge sitting on the bed next to my little baby but it fit her perfectly. I hope it lasts the summer.


Cheyenne Weil, Joshua Coxwell